Manage Bookings
In this post, we’ll walk you through:
You can enable bookings in the event settings for each event individually. When Bookings are enabled for an event, users can submit their participation through a booking form. Once a user has submitted a Booking, you can manage it. The following explains step by step how to manage Bookings for an event.
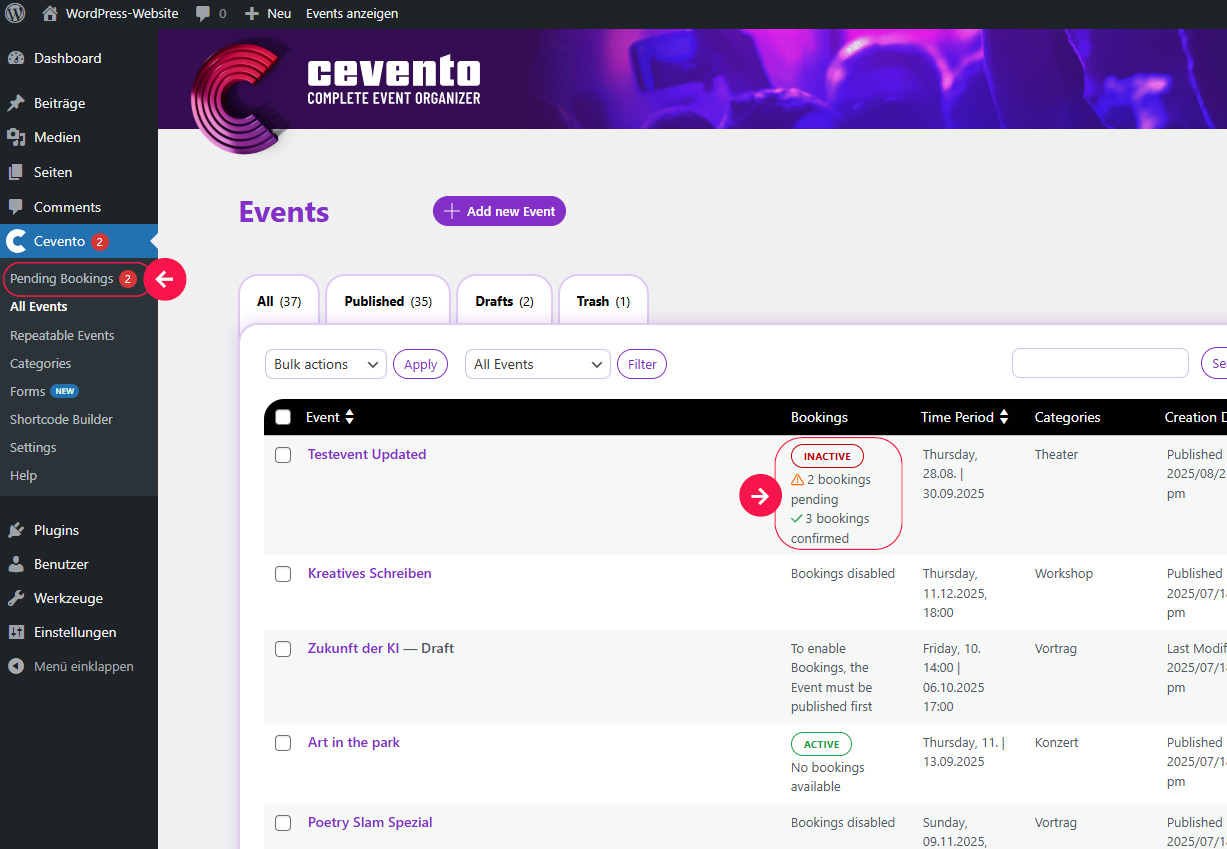
In the event table, booking statuses are displayed next to the event, and the menu item Pending Bookings appears in the Cevento dashboard menu.
Open event editor
To manage Bookings for an event, first go to the WordPress dashboard and navigate to Cevento → All Events. In the Cevento dashboard event overview, the Bookings column shows whether bookings are enabled for the respective event (as text or with the status badge Active).
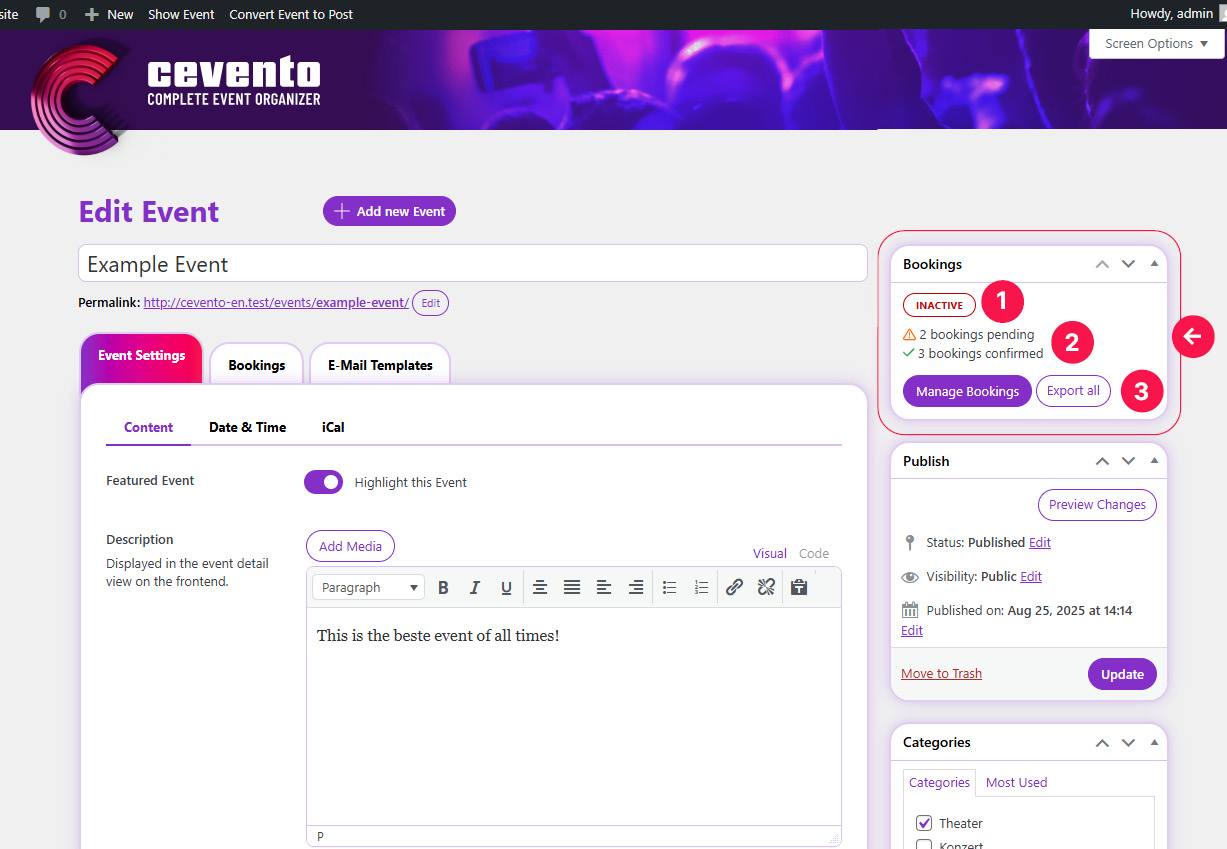
Now click on the event title or hover over the title and click the Edit link. After clicking, you’ll land in the event editor and see the Bookings metabox on the right.
Locate the Bookings metabox
In the event editor, the Bookings metabox on the right displays the status [1], a short overview of the number of pending and confirmed Bookings [2], and two buttons that let you manage and export the Bookings [3].
Special case Recurring Events
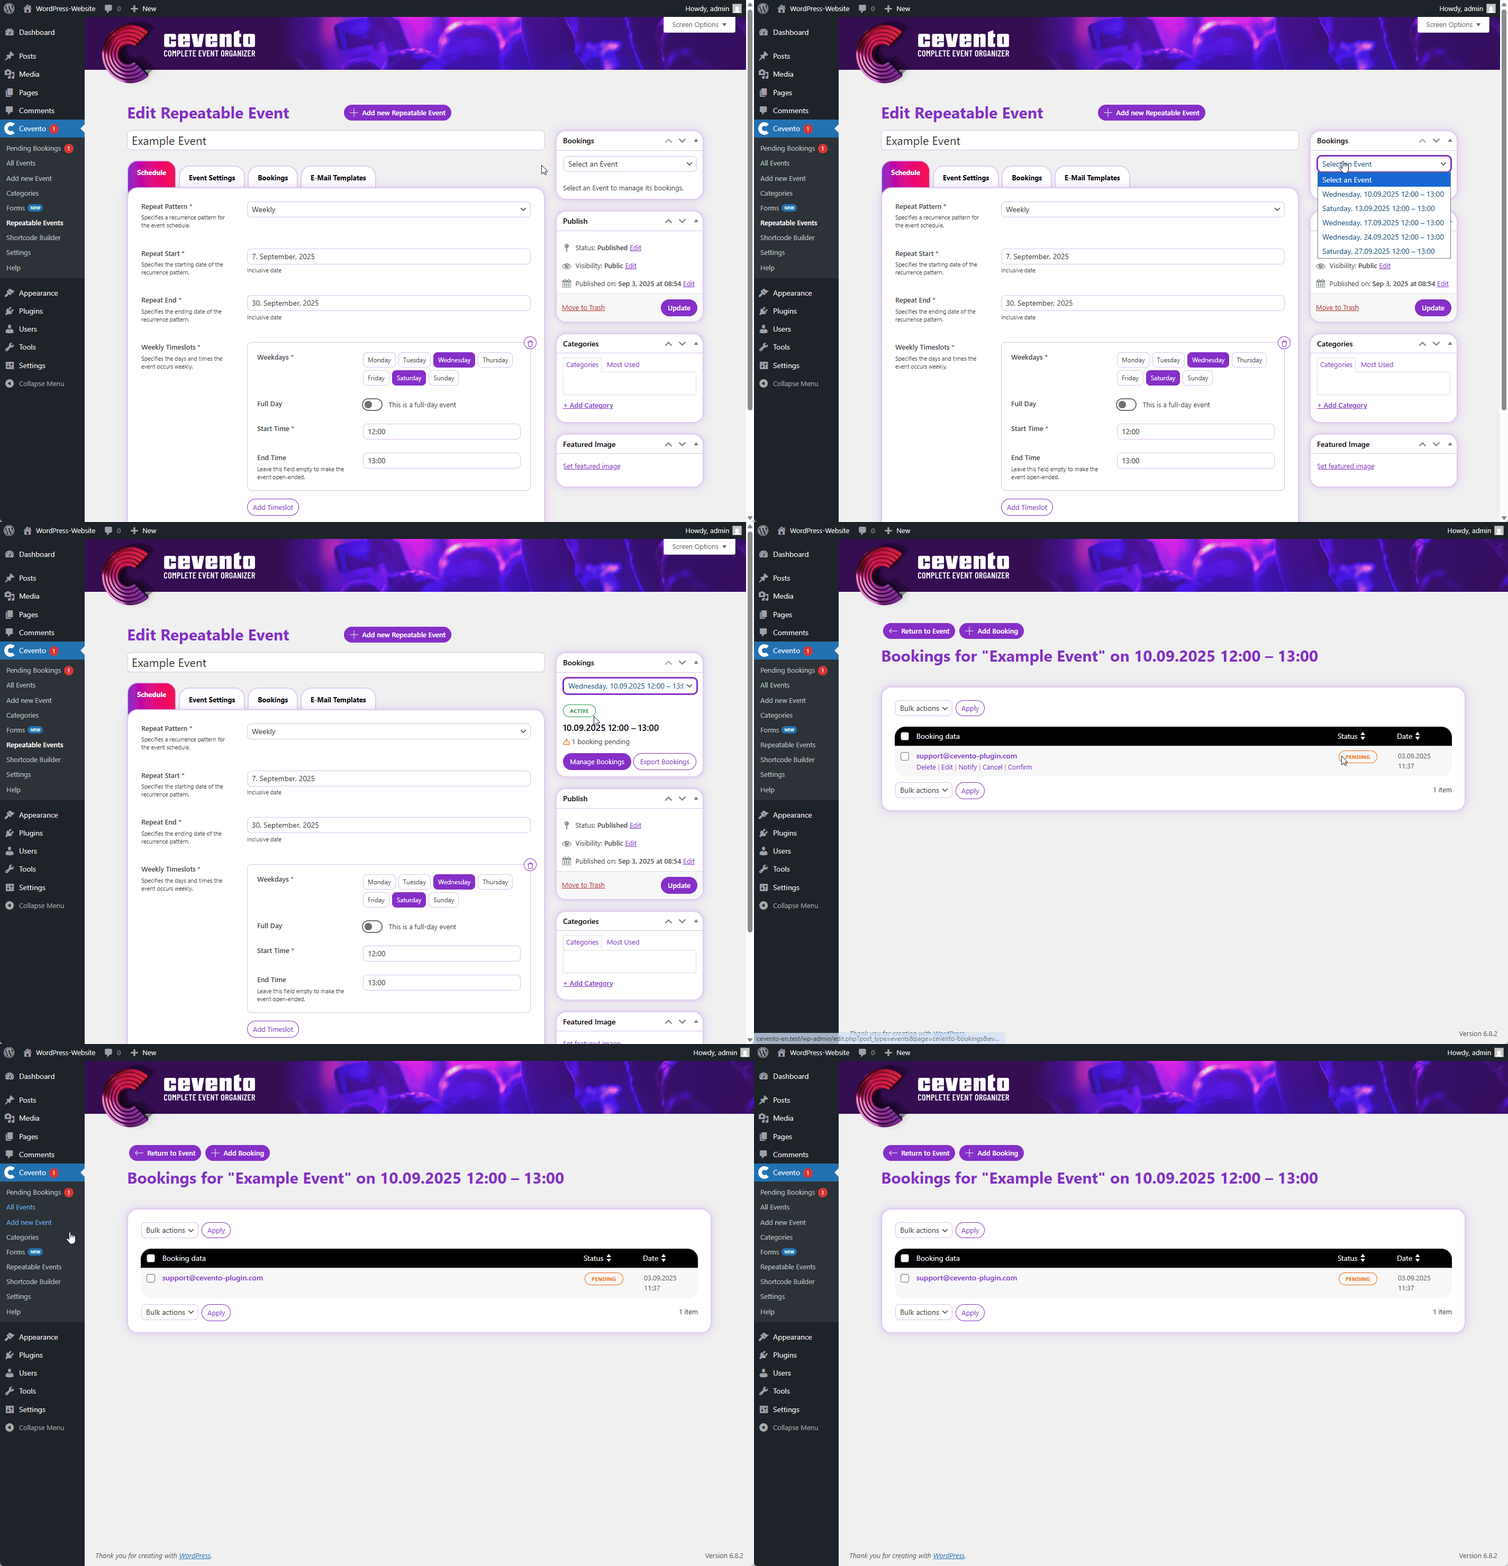
For Recurring events, you must first select the day in the Bookings metabox for which you want to manage the Bookings. Once you’ve selected a day, you’ll see the status, overview of the number, and the two buttons for managing and exporting.
Open booking overview
After clicking the Manage Bookings button in the Bookings metabox, you’ll land on an overview of the bookings for this event.
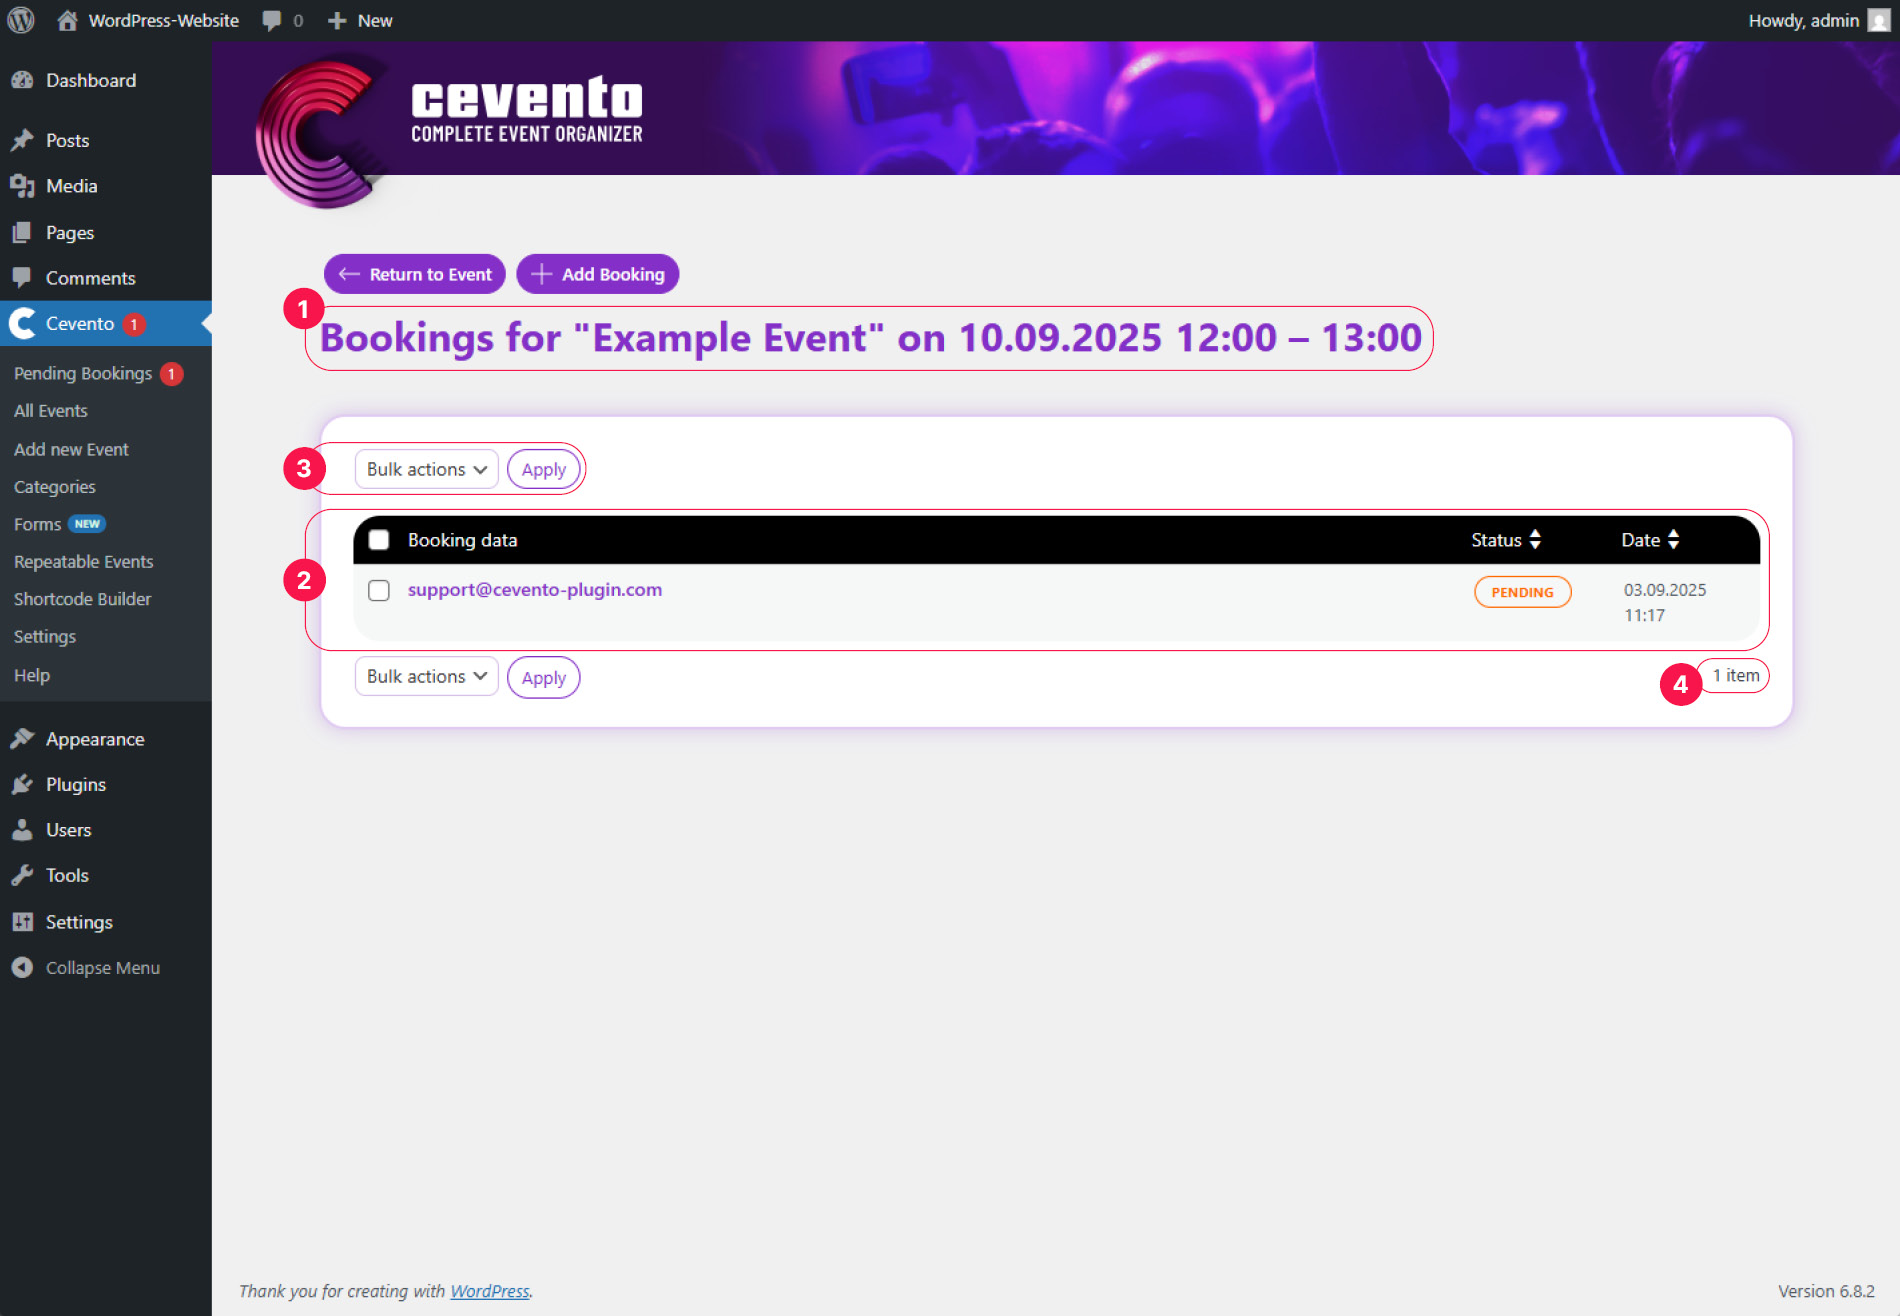
The event and date currently shown in the booking overview can be read in the heading [1]. The booking overview displays all bookings for the respective event in a table [2]. Above and below the table you’ll find the bulk actions function [3]. Here you can perform actions (delete, export, confirm, cancel) for multiple bookings at once. In the bottom right, the total number of bookings received is displayed [4].
Booking data
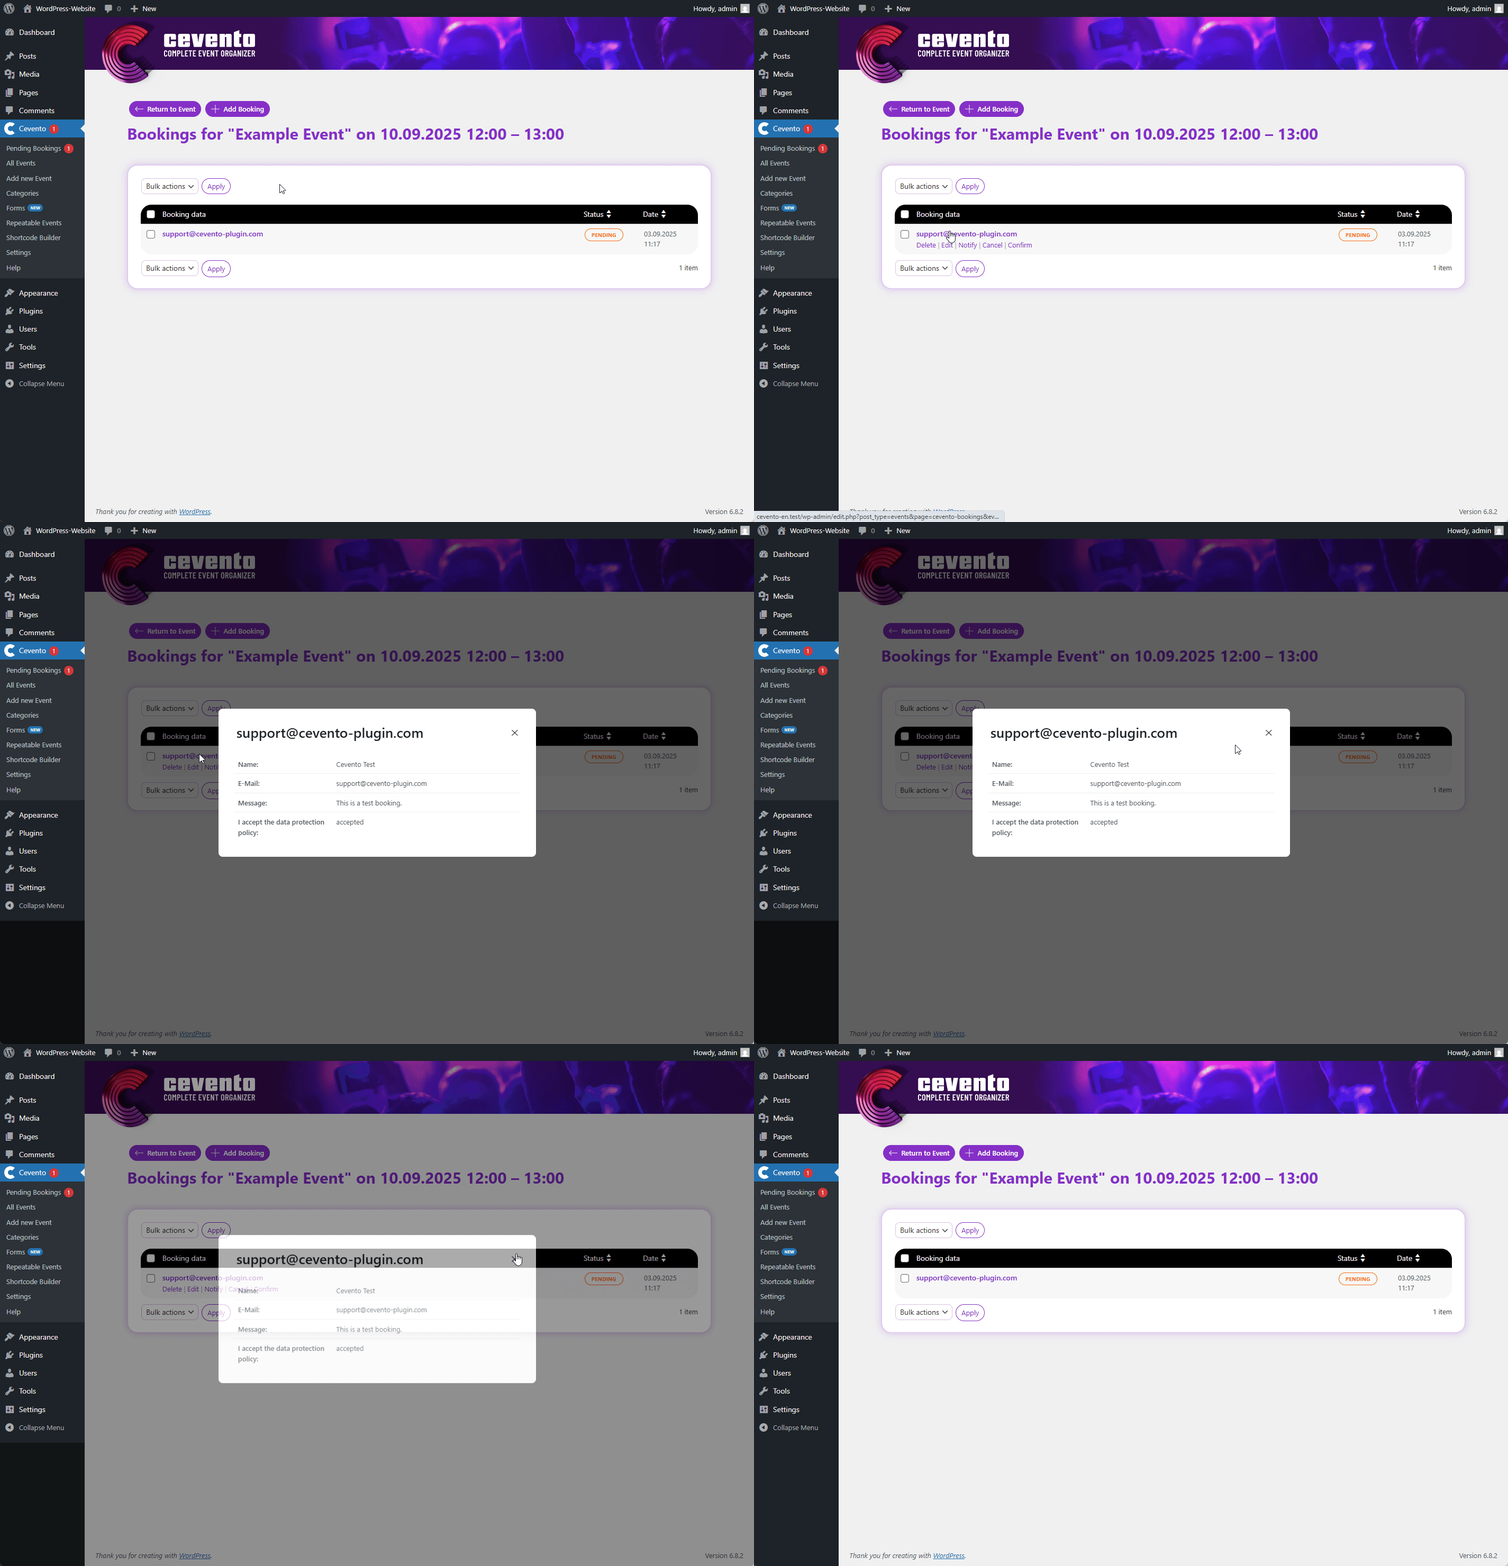
To view individual Booking data, click the email address. Sometimes instead of the email address, the text [Outdated submission] may appear in the Booking data column. This happens if bookings were received for your event and later a different form was selected in the settings. The data can then no longer be matched correctly.
Actions
You can perform different actions for a single booking. To display the available actions, hover over the email address (or [Outdated submission]). Links for the actions Delete, Edit, E-Mail, and Cancel (or Confirm) will then appear.
Before performing any action, carefully read what the action will do. This way you’ll know whether the action can be canceled or undone.
Delete
To delete a booking, click Delete. A pop-up will appear where you can confirm your decision to permanently delete the booking or cancel the process.
Edit
You can also edit a booking after it has been received. To do so, click the Edit link. A pop-up window will open, showing the completed booking form, and you can adjust the data as desired. If you’re unhappy with your changes, you can click the button with the icon (Reload Preview) in the top right. This reloads the preview and resets any unsaved changes. If you’re satisfied, save by clicking Update at the end of the form. The booking will then be updated with your changes.
This action allows you to trigger the email(s) for a booking event. These emails will be sent without changing the booking status. To do this, select the desired E-Mail Template in the dropdown and click the Send Notification button.
Cancel
To reject a booking, click Cancel. The status will then change to Cancelled. Additionally, under certain conditions, admins and users will each receive a cancellation notification via email. You can read the conditions in the emails documentation.
You can undo this action by clicking Confirm under the booking. Keep in mind that doing so may again trigger emails to your users.
Confirm
To confirm a booking, click Confirm. Once confirmed, its status changes to Confirmed. Additionally, under certain conditions, admins and users each receive a booking confirmation email. The conditions can be found in the emails documentation.
Bulk actions
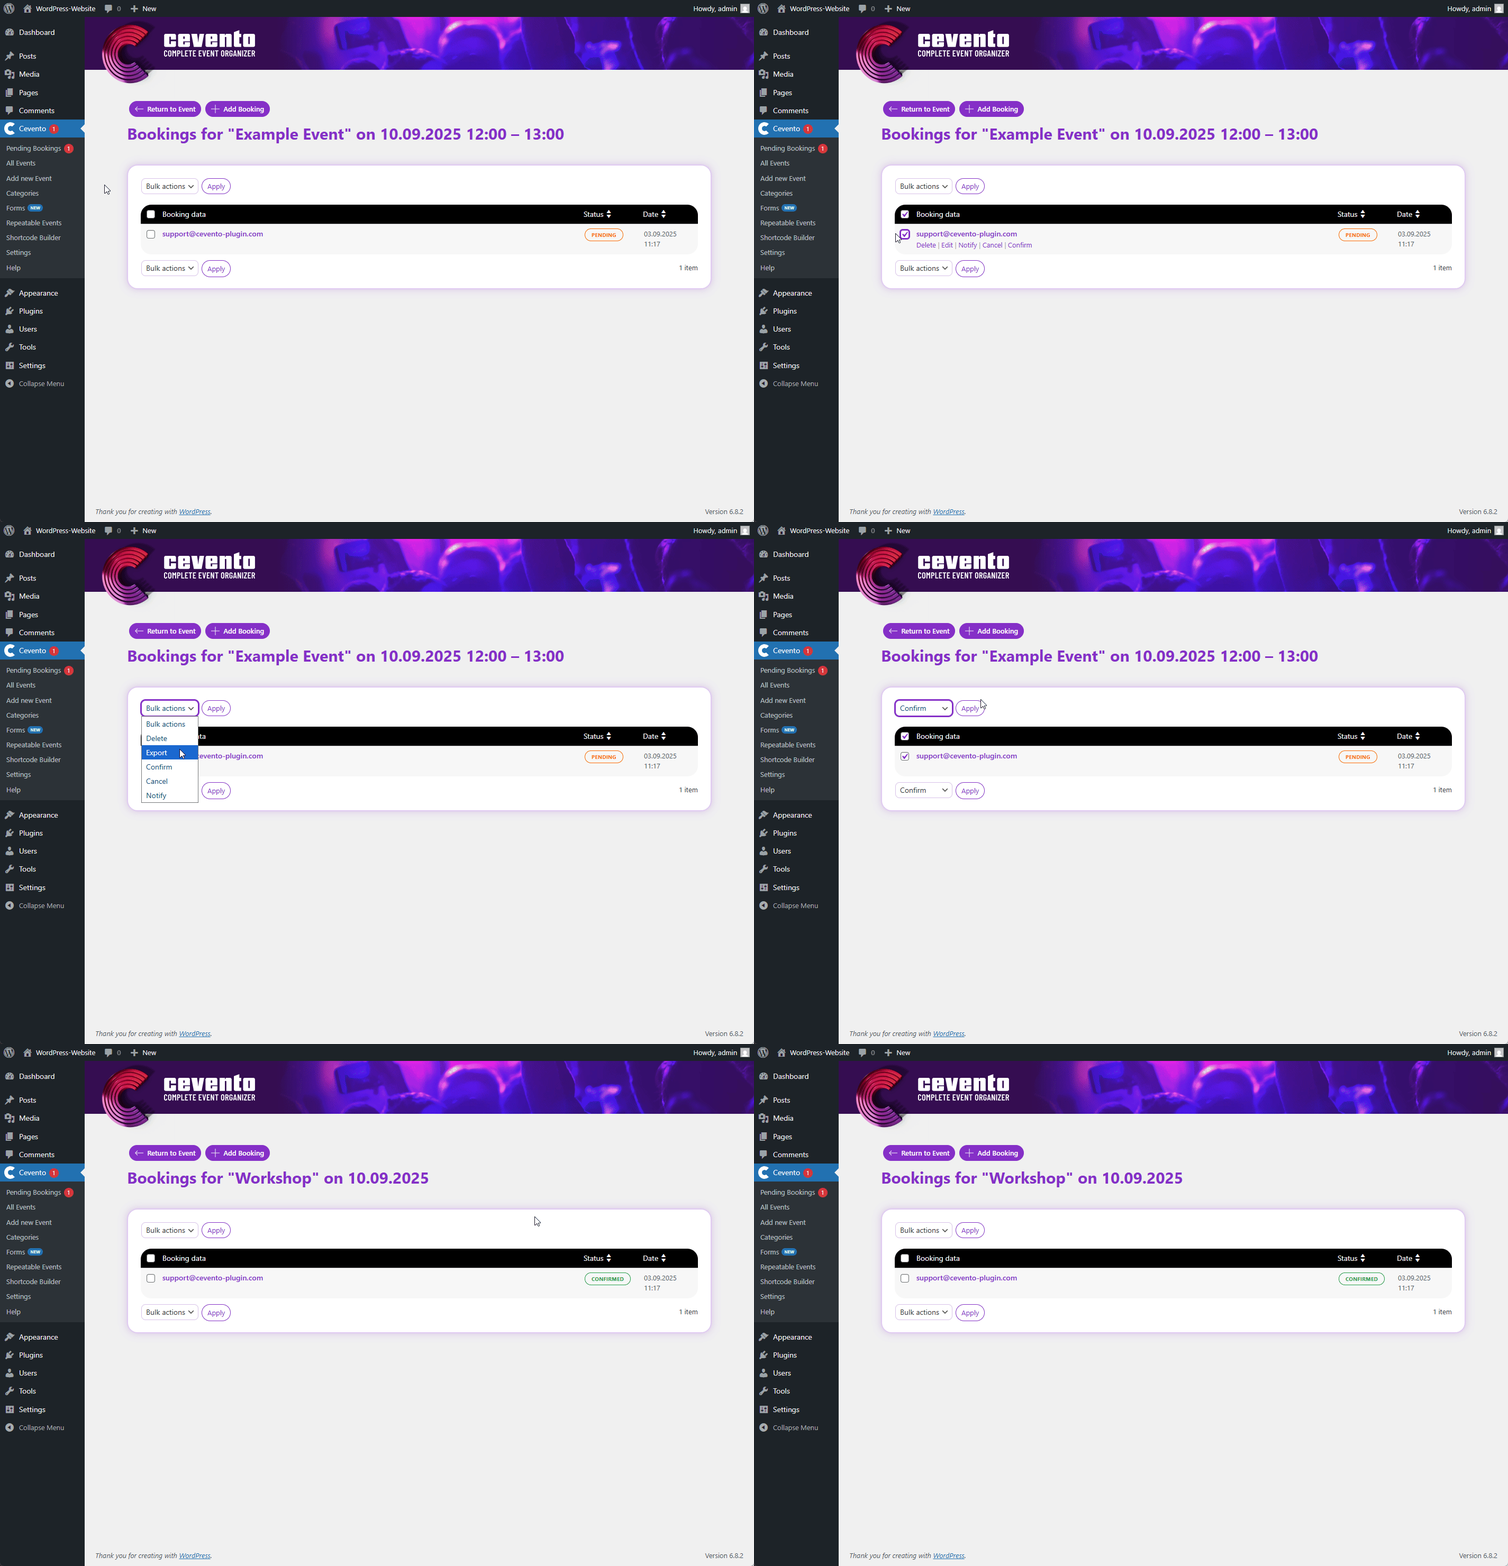
The actions listed above can also be performed for multiple bookings at once. To do so, select the checkbox next to each booking you want to include. If you want to perform the action for all bookings, check the box next to the Booking data column heading. Next, click the Bulk actions dropdown above the table and select the desired action. Then click the Apply button next to it. The action will be executed immediately.
Delete & Confirm & Cancel
These actions work exactly the same as for individual bookings – see Delete, E-Mail, Cancel, and Confirm above.
Exportieren
You have the option to export booking data for an event as a CSV file. There are several ways to export all or only certain booking data. You can open the exported file in a spreadsheet programme such as Microsoft Excel or LibreOffice Calc and read the raw data of your bookings.
Mehrfachaktionen
You can use multiple actions to export specific or all bookings as a CSV file. To do this, select the action Export. Once you have clicked on the Apply button, the CSV file will start downloading in your browser.
Metabox Export Tool
In the booking management section of your event, you will find up to three buttons in the Metabox Export Tool.
Export all Bookings
Clicking on this button will export all bookings, including those which have not been completed.
Export confirmed Bookings
Clicking this button exports all confirmed bookings.
Export all Participants
This button is only available if you have included a field of type Participants in your booking form. Clicking this button will only export the participant data from confirmed (or paid) bookings.
Status
The following booking statuses exist:
- Pending (yellow): New bookings with no action taken yet.
- Cancelled (red): Bookings for which the Cancel action was performed.
- Confirmed (green): Bookings for which the Confirm action was performed.